
 As a gametype, I love ONSLAUGHT.
DeathMatch (DM) and Team DeathMatch (TDM) gametypes have a simple no-brainer goal: racking up kills. Skill plays a part in it, as does knowledge of the maps: knowing areas to hide, places to jump, safe and dangerous zones, routes to navigate, etc.
These attributes also help on Capture The Flag (CTF/vCTF) and Bombing Run (BR) gametypes, but here the aim of the game anchors you to a base – whether it’s defending your own or flag-snatching from the opposition… all of which provide the wider team objectives: getting the flag/ball to a fixed point. Life is unimportant for these gametypes: it’s not uncommon to sacrifice yourself in favour of the ball/flag getting to its destination – racking up kills is no good if the team loses 3-2.
The same holds for Domination, except each point is owner-less – it could be blue or red – but still, map knowledge provides an advantage in deciding which direction to take towards cover or exposure, etc.
ONS combines several of these objectives together: it’s not just a killing game, there’s cores (the base) to defend and attack, but you can’t immediately mount an attack on the enemy base or snatch their flag – you need to work your way up gradually by linking nodes. However, once players get to know the map well the game becomes a similar plod consisting of satisfying specific smaller key objectives to guarantee overall success.
Hence having random/new link configurations injects some freshness into the game: it’s still the same map with same weapons, vehicles, etc – but the order in which nodes are taken changes gameplay somewhat.
So I’ve been playing with link configurations and realised they’re not just some random join-the-dots. Each pattern imposes a particular influence upon gameplay, and more complex configurations are simply aggregates of some basic atomic building blocks. Let’s take a look at these simpletons in detail.
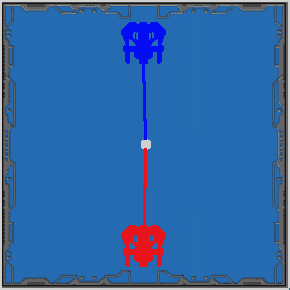
Single-Node Maps
The simplest pattern is a fight over one central node (which seems too simple for any Onslaught map but it’s the fundamentals of ONS-Frostbite):
The attacking strategy here seems fairly obvious: seize the node then attack the enemy base. Once the node is captured, the opponents’ defensive strategy determines the outcome of that game:
- devoting all resources to core protection means stray shots eventually finding their target until the attackers eventually triumph
- a node counter-attack should lock out the core out once the node has drained.
So defenders need to consider resource allocation carefully: do they send a small party of good players out to attack the node, leaving the majority of their forces to defend and buy their counter-attackers some time? Or should they keep their good players in defence, letting a larger army swarm the node?
Consequently, attackers may need to rethink their strategy: everyone advancing onto the core leaves the node unprotected for the counter-attack. Should the better players hold the node for a stronger defence, or charge forward to take down the core quickly whilst their defence team buys them attacking time?
Either way, this minimal single-node placement means there’s still strategic considerations for the teamwork.
Two-Node Maps
Let’s now consider a 2-node configuration. There are really only two ways of linking these:
- sequential – one single route traversing several nodes
- parallel – multiple routes between the bases
Multi-route (Parallel Paths)
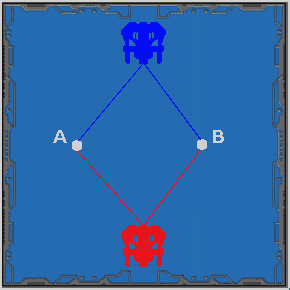 This multi-route configuration works much like the single node approach, in which an attacking team not only need to defend their captured node, but can also protect their own core by attacking (or at least hinder the capture of) the enemy node.
Teams fall into a natural three-way split:
- attackers – those capturing and taking new nodes, advancing their team’s march
- defenders – those holding existing nodes from counter-attack, keeping them topped up to prevent advancement lock-out
- blockers – those that seek to impede enemy progress. Although nodes cannot be attacked directly, players and their vehicles en-route can – at the least to wear down vehicle health.
Clashes and conflicts along the way always provide good gameplay – let’s not forget our overall aims here.
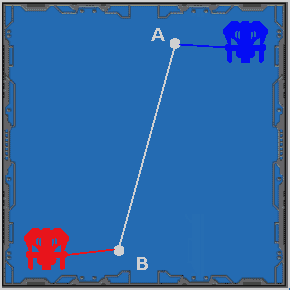
Consider also actual node placements: what if if the two nodes weren’t equidistant from the cores? As an example:
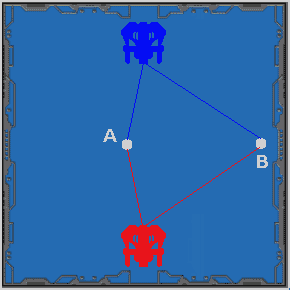 For this setup, the A route appears more desirable than B – given the shorter path – until terrain characteristics are considered, such as:
- B could be quite accessible, compared to A which is situated in a difficult-to-reach valley
- B could be under cover and quite defensible but A could lie exposed atop a hill, easily attacked from overhead assailants
- B may reward players with a tank or leviathan; A only provides a scorpion and a hellbender.
If a node looks undesirable compared to others, there must be a reason to bring it into play; the distance disadvantage should be balanced against benefits of seizing that node – otherwise both teams will easily shun it.
Single-route (Linear path)
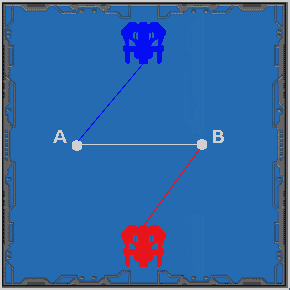 Unfortunately parallel path setups suffer from an isolation issue: it’s possible for both cores to be in danger simultaneously, meaning both teams could advance onto the enemy core without ever meeting each other, so gameplay simply descends to a race-to-finish.
The linear path – nodes being linked sequentially – forces the teams to meet, so sides initially race to capture as many nodes as possible before the eventual clash, when the usual attack/defend splits occur with teams, with advancement measured by numbers of captured nodes.
But let’s not forget aspects of the map itself, in particular node placement. Consider a map in which nodes are placed in fairly close proximity to the cores. One such link configuration is an obvious Shortest Path First chain, ie.:
 However, there is another route – The Longest March – a route that maximises travel between nodes:
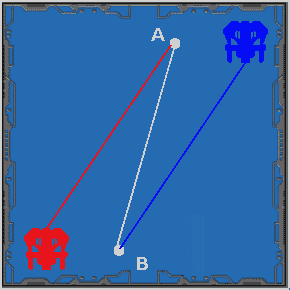 This particular configuration increases the possibility of an earlier face-off, and biases combat against attackers:
- the additional travel time provides an incentive to attackers to bring more vehicles into play
- vehicle choice becomes important, balancing capability versus speed: fast-travelling vehicles (manta/raptor/scorpion) cover ground quickly but are taken out more easily; those with more destructive capability (tank/paladin/leviathan) move slowly, increasing the time taken to join the battle
- attackers need to transport resources over long journeys to combat defenders enjoying a the plentiful weapons readily available around their core, so greater teamwork is encouraged – such as using co-operative vehicles (like the hellbender) to transport several players
- attackers rushing headlong into action quickly become cannon fodder when overwhelmed by the strategically-advantaged team, so proper planning becomes necessary, such as bringing in a the raptor for overhead support.
Once a node is seized, doubling back to the next node provides several opportunities to encounter opposition – and conflict is fun, folks!
Again, terrain itself needs to be considered: paths between nodes aren’t necessarily straight lines, and some nodes could be underground or tunnelled (ONS-Sanctuary is a good example) so overhead transport may not be the best tactical choice.
So, good gameplay requires a combination of good terrain, good node placement with suitable awards and good link routes.
In the second part of this article, we’ll discuss configuration patters for three (and more) nodes.